Conjunto Floresta Celta: diferenças entre revisões
Saltar para a navegação

mSem resumo de edição |
|||
| (Há 9 edições intermédias do mesmo utilizador que não estão a ser apresentadas) | |||
| Linha 1: | Linha 1: | ||
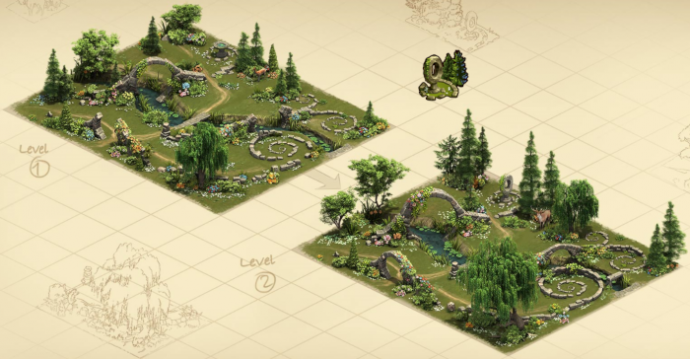
O Conjunto Floresta Celta [[File:CelticForestSet.png|link=]] é um conjunto | O Conjunto Floresta Celta [[File:CelticForestSet.png|link=]] é um conjunto composto por 5 edifícios diferentes, que podem ser melhorados para um segundo nível: | ||
{|style="width: 100%; margin: auto;" border=2% | {|style="width: 100%; margin: auto;" border=2% | ||
|[[file:LoadingScreenCelticSet.png|690px|center|link=]] | |[[file:LoadingScreenCelticSet.png|690px|center|link=]] | ||
|} | |} | ||
<br><br> | <br><br> | ||
{| style="width: | {| style="width: 85%; margin: auto;" | ||
! style="text-align: center; | ! style="text-align: center; color: black; background-color: orange" colspan="3" | '''[[Gamo Majestoso - Nvl 1]]''' | ||
! style="text-align: center; color: black; background-color: orange" colspan="3" | '''[[Gamo Majestoso - Nvl 2]]''' | |||
! style="text-align: center; | |||
|- | |- | ||
| style="text-align: center;" | {{sized-external-image|100px|https://foept.innogamescdn.com/assets/city/buildings/L_SS_AllAge_PatrickBonusSet20a.png}} | | style="text-align: center;" rowspan="3" | {{sized-external-image|100px|https://foept.innogamescdn.com/assets/city/buildings/L_SS_AllAge_PatrickBonusSet20a.png}} | ||
| | | 1 [[File:CelticForestSet.png|Com 1 edifício diferente do mesmo conjunto|link=]] | ||
| style="text-align: center;" | {{sized-external-image| | | {{sized-external-image|20px|https://foept.innogamescdn.com/assets/shared/icons/medals.png}} | ||
| | | style="text-align: center;" rowspan="3" | {{sized-external-image|100px|https://foept.innogamescdn.com/assets/city/buildings/L_SS_AllAge_PatrickBonusSet20b.png}} | ||
| 1 [[File:CelticForestSet.png|Com 1 edifício diferente do mesmo conjunto|link=]] | |||
| {{sized-external-image|20px|https://foept.innogamescdn.com/assets/shared/icons/medals.png}} | |||
|- | |- | ||
| | | 2 [[File:CelticForestSet.png|Com 2 edifícios diferentes do mesmo conjunto|link=]] | ||
2 [[File:CelticForestSet.png|Com 2 edifícios diferentes do mesmo conjunto|link=]] | | 1 {{sized-external-image|20px|https://foept.innogamescdn.com/assets/shared/icons/icon_strategy_points.png}} | ||
| 2 [[File:CelticForestSet.png|Com 2 edifícios diferentes do mesmo conjunto|link=]] | |||
| 1 | | 2 {{sized-external-image|20px|https://foept.innogamescdn.com/assets/shared/icons/icon_strategy_points.png}} | ||
2 [[File:CelticForestSet.png|Com 2 edifícios diferentes do mesmo conjunto|link=]] | |||
| | |||
2 | |||
|- | |- | ||
| 3 [[File:CelticForestSet.png|Com 3 edifícios diferentes do mesmo conjunto|link=]] | |||
| 2% {{sized-external-image|20px|https://foept.innogamescdn.com/assets/shared/icons/att_boost_attacker.png}} | |||
| 3 [[File:CelticForestSet.png|Com 3 edifícios diferentes do mesmo conjunto|link=]] | |||
| 4% {{sized-external-image|20px|https://foept.innogamescdn.com/assets/shared/icons/att_boost_attacker.png}} | |||
|- | |- | ||
! style="text-align: center; color: black; background-color: orange" colspan="3" | '''[[Pedra em Pé - Nvl 1]]''' | |||
! style="text-align: center; color: black; background-color: orange" colspan="3" | '''[[Pedra em Pé - Nvl 2]]''' | |||
|- | |- | ||
| | | style="text-align: center;" rowspan="2" | {{sized-external-image|100px|https://foept.innogamescdn.com/assets/city/buildings/D_SS_MultiAge_PatrickBonusSet20a.png}} | ||
| 1 [[File:CelticForestSet.png|Com 1 edifício diferente do mesmo conjunto|link=]] | |||
| 1 [[File:CelticForestSet.png|Com 1 edifício diferente do mesmo | | 3% {{sized-external-image|20px|https://foept.innogamescdn.com/assets/shared/icons/supplies.png}} | ||
| style="text-align: center;" rowspan="2" | {{sized-external-image|100px|https://foept.innogamescdn.com/assets/city/buildings/D_SS_MultiAge_PatrickBonusSet20b.png}} | |||
| | | 1 [[File:CelticForestSet.png|Com 1 edifício diferente do mesmo conjunto|link=]] | ||
| 6% {{sized-external-image|20px|https://foept.innogamescdn.com/assets/shared/icons/supplies.png}} | |||
| 1 [[File:CelticForestSet.png|Com 1 edifício diferente do mesmo conjunto|link=]] | |||
|- | |- | ||
| 2 [[File:CelticForestSet.png|Com 2 edifícios diferentes do mesmo conjunto|link=]] | |||
| 3% {{sized-external-image|20px|https://foept.innogamescdn.com/assets/shared/icons/att_boost_defender.png}} | |||
| 2 [[File:CelticForestSet.png|Com 2 edifícios diferentes do mesmo conjunto|link=]] | |||
| 6% {{sized-external-image|20px|https://foept.innogamescdn.com/assets/shared/icons/att_boost_defender.png}} | |||
|- | |- | ||
| style="text-align: center;" | {{sized-external-image|200px|https://foept.innogamescdn.com/assets/city/buildings/ | ! style="text-align: center; color: black; background-color: orange" colspan="3" | '''[[Salgueiro do Druida - Nvl 1]]''' | ||
| 1 [[File:CelticForestSet.png|Com 1 edifício diferente do mesmo conjuntos|link=]] 1 {{sized-external-image|20px|https://foept.innogamescdn.com/assets/shared/icons/icon_strategy_points.png}} | ! style="text-align: center; color: black; background-color: orange" colspan="3" | '''[[Salgueiro do Druida - Nvl 2]]''' | ||
2 [[File:CelticForestSet.png|Com 2 edifícios diferentes do mesmo conjunto|link=]] {{sized-external-image|20px|https://foept.innogamescdn.com/assets/shared/icons/ | |- | ||
3 [[File:CelticForestSet.png|Com 3 edifícios diferentes do mesmo conjunto|link=]] 5 {{sized-external-image|20px|https://foept.innogamescdn.com/assets/shared/icons/goods.png}} | | style="text-align: center;" rowspan="2" | {{sized-external-image|200px|https://foept.innogamescdn.com/assets/city/buildings/A_SS_MultiAge_PatrickBonusSet20a.png}} | ||
| 1 [[File:CelticForestSet.png|Com 1 edifício diferente do mesmo conjuntos|link=]] | |||
| style="text-align: center;" | {{sized-external-image| | | 3% {{sized-external-image|20px|https://foept.innogamescdn.com/assets/shared/icons/def_boost_defender.png}} | ||
| 1 [[File:CelticForestSet.png|Com 1 edifício diferente do mesmo conjuntos|link=]] 2 {{sized-external-image|20px|https://foept.innogamescdn.com/assets/shared/icons/icon_strategy_points.png}} | | style="text-align: center;" rowspan="2" | {{sized-external-image|200px|https://foept.innogamescdn.com/assets/city/buildings/A_SS_MultiAge_PatrickBonusSet20b.png}} | ||
2 [[File:CelticForestSet.png|Com 2 edifícios diferentes do mesmo conjunto|link=]] {{sized-external-image|20px|https://foept.innogamescdn.com/assets/shared/icons/medals.png}} | | 1 [[File:CelticForestSet.png|Com 1 edifício diferente do mesmo conjuntos|link=]] | ||
3 [[File:CelticForestSet.png|Com 3 edifícios diferentes do mesmo conjunto|link=]] 10 {{sized-external-image|20px|https://foept.innogamescdn.com/assets/shared/icons/goods.png}} | | 6% {{sized-external-image|20px|https://foept.innogamescdn.com/assets/shared/icons/def_boost_defender.png}} | ||
4 [[File:CelticForestSet.png|Com | |- | ||
| 2 [[File:CelticForestSet.png|Com 2 edifícios diferentes do mesmo conjunto|link=]] | |||
| 3% {{sized-external-image|20px|https://foept.innogamescdn.com/assets/shared/icons/def_boost_attacker.png}} | |||
| 2 [[File:CelticForestSet.png|Com 2 edifícios diferentes do mesmo conjunto|link=]] | |||
| 6% {{sized-external-image|20px|https://foept.innogamescdn.com/assets/shared/icons/def_boost_attacker.png}} | |||
|- | |||
! style="text-align: center; color: black; background-color: orange" colspan="3" | '''[[Anéis de Fada - Nvl 1]]''' | |||
! style="text-align: center; color: black; background-color: orange" colspan="3" | '''[[Anéis de Fada - Nvl 2]]''' | |||
|- | |||
| style="text-align: center;" rowspan="3" | {{sized-external-image|250px|https://foept.innogamescdn.com/assets/city/buildings/R_SS_MultiAge_PatrickBonusSet20c.png}} | |||
| 1 [[File:CelticForestSet.png|Com 1 edifício diferente do mesmo conjunto|link=]] | |||
| {{sized-external-image|20px|https://foept.innogamescdn.com/assets/shared/icons/supplies.png}} | |||
| style="text-align: center;" rowspan="3" | {{sized-external-image|250px|https://foept.innogamescdn.com/assets/city/buildings/R_SS_MultiAge_PatrickBonusSet20d.png}} | |||
| 1 [[File:CelticForestSet.png|Com 1 edifício diferente do mesmo conjunto|link=]] | |||
| {{sized-external-image|20px|https://foept.innogamescdn.com/assets/shared/icons/supplies.png}} | |||
|- | |||
| 2 [[File:CelticForestSet.png|Com 2 edifícios diferentes do mesmo conjunto|link=]] | |||
| 2 {{sized-external-image|20px|https://foept.innogamescdn.com/assets/shared/icons/icon_strategy_points.png}} | |||
| 2 [[File:CelticForestSet.png|Com 2 edifícios diferentes do mesmo conjunto|link=]] | |||
| 4 {{sized-external-image|20px|https://foept.innogamescdn.com/assets/shared/icons/icon_strategy_points.png}} | |||
|- | |||
| 3 [[File:CelticForestSet.png|Com 3 edifícios diferentes do mesmo conjunto|link=]] | |||
| 5 {{sized-external-image|20px|https://foept.innogamescdn.com/assets/shared/icons/goods.png}} | |||
| 3 [[File:CelticForestSet.png|Com 3 edifícios diferentes do mesmo conjunto|link=]] | |||
| 10 {{sized-external-image|20px|https://foept.innogamescdn.com/assets/shared/icons/goods.png}} | |||
|- | |||
! style="text-align: center; color: black; background-color: orange" colspan="3" | '''[[Portão da Lua - Nvl 1]]''' | |||
! style="text-align: center; color: black; background-color: orange" colspan="3" | '''[[Portão da Lua - Nvl 2]]''' | |||
|- | |||
| style="text-align: center;" rowspan="4" | {{sized-external-image|250px|https://foept.innogamescdn.com/assets/city/buildings/R_SS_MultiAge_PatrickBonusSet20a.png}} | |||
| 1 [[File:CelticForestSet.png|Com 1 edifício diferente do mesmo conjuntos|link=]] | |||
| 1 {{sized-external-image|20px|https://foept.innogamescdn.com/assets/shared/icons/icon_strategy_points.png}} | |||
| style="text-align: center;" rowspan="4" | {{sized-external-image|250px|https://foept.innogamescdn.com/assets/city/buildings/R_SS_MultiAge_PatrickBonusSet20b.png}} | |||
| 1 [[File:CelticForestSet.png|Com 1 edifício diferente do mesmo conjuntos|link=]] | |||
| 2 {{sized-external-image|20px|https://foept.innogamescdn.com/assets/shared/icons/icon_strategy_points.png}} | |||
|- | |||
| 2 [[File:CelticForestSet.png|Com 2 edifícios diferentes do mesmo conjunto|link=]] | |||
| {{sized-external-image|20px|https://foept.innogamescdn.com/assets/shared/icons/medals.png}} | |||
| 2 [[File:CelticForestSet.png|Com 2 edifícios diferentes do mesmo conjunto|link=]] | |||
| {{sized-external-image|20px|https://foept.innogamescdn.com/assets/shared/icons/medals.png}} | |||
|- | |||
| 3 [[File:CelticForestSet.png|Com 3 edifícios diferentes do mesmo conjunto|link=]] | |||
| 5 {{sized-external-image|20px|https://foept.innogamescdn.com/assets/shared/icons/goods.png}} | |||
| 3 [[File:CelticForestSet.png|Com 3 edifícios diferentes do mesmo conjunto|link=]] | |||
| 10 {{sized-external-image|20px|https://foept.innogamescdn.com/assets/shared/icons/goods.png}} | |||
|- | |||
| 4 [[File:CelticForestSet.png|Com 4 edifícios diferentes do mesmo conjunto|link=]] | |||
| 2 {{sized-external-image|20px|https://foept.innogamescdn.com/assets/shared/icons/icon_strategy_points.png}} | |||
| 4 [[File:CelticForestSet.png|Com 4 edifícios diferentes do mesmo conjunto|link=]] | |||
| 6 {{sized-external-image|20px|https://foept.innogamescdn.com/assets/shared/icons/icon_strategy_points.png}} | |||
|} | |} | ||
====Melhorar o Conjunto Floresta Celta==== | ====Melhorar o Conjunto Floresta Celta==== | ||
Para melhorar cada um dos edifícios do Conjunto Floresta Celta | Para melhorar cada um dos edifícios do Conjunto Floresta Celta é necessário um item de melhoria específico para cada um deles. Com o Kit de Seleção é possível escolher entre obter esse edifício no nível 1 ou a sua melhoria. | ||
{|style="width:85%; margin: auto; style="height:100px;" border=2% | {|style="width:85%; margin: auto; style="height:100px;" border=2% | ||
|- style="vertical-align: center;" | |- style="vertical-align: center;" | ||
| Linha 74: | Linha 110: | ||
|style="text-align:center;"| {{sized-external-image|100px|https://foept.innogamescdn.com/assets/city/buildings/L_SS_AllAge_PatrickBonusSet20b.png}} | |style="text-align:center;"| {{sized-external-image|100px|https://foept.innogamescdn.com/assets/city/buildings/L_SS_AllAge_PatrickBonusSet20b.png}} | ||
|- style="vertical-align: center;" | |- style="vertical-align: center;" | ||
|style="text-align:center;"| {{sized-external-image| | |style="text-align:center;"| {{sized-external-image|100px|https://foept.innogamescdn.com/assets/city/buildings/D_SS_MultiAge_PatrickBonusSet20a.png}} | ||
|style="text-align:center;"| {{sized-external-image|80px|https://foept.innogamescdn.com/assets/shared/icons/reward_icons/reward_icon_upgrade_kit_standing_stone.png}} | |style="text-align:center;"| {{sized-external-image|80px|https://foept.innogamescdn.com/assets/shared/icons/reward_icons/reward_icon_upgrade_kit_standing_stone.png}} | ||
|style="text-align:center;"| {{sized-external-image| | |style="text-align:center;"| {{sized-external-image|100px|https://foept.innogamescdn.com/assets/city/buildings/D_SS_MultiAge_PatrickBonusSet20b.png}} | ||
|- style="vertical-align: center;" | |- style="vertical-align: center;" | ||
|style="text-align:center;"| {{sized-external-image| | |style="text-align:center;"| {{sized-external-image|200px|https://foept.innogamescdn.com/assets/city/buildings/A_SS_MultiAge_PatrickBonusSet20a.png}} | ||
|style="text-align:center;"| {{sized-external-image|80px|https://foept.innogamescdn.com/assets/shared/icons/reward_icons/reward_icon_upgrade_kit_druid_willow.png}} | |style="text-align:center;"| {{sized-external-image|80px|https://foept.innogamescdn.com/assets/shared/icons/reward_icons/reward_icon_upgrade_kit_druid_willow.png}} | ||
|style="text-align:center;"| {{sized-external-image| | |style="text-align:center;"| {{sized-external-image|200px|https://foept.innogamescdn.com/assets/city/buildings/A_SS_MultiAge_PatrickBonusSet20b.png}} | ||
|- style="vertical-align: center;" | |- style="vertical-align: center;" | ||
|style="text-align:center;"| {{sized-external-image| | |style="text-align:center;"| {{sized-external-image|250px|https://foept.innogamescdn.com/assets/city/buildings/R_SS_MultiAge_PatrickBonusSet20c.png}} | ||
|style="text-align:center;"| {{sized-external-image|80px|https://foept.innogamescdn.com/assets/shared/icons/reward_icons/reward_icon_upgrade_kit_faery_rings.png}} | |style="text-align:center;"| {{sized-external-image|80px|https://foept.innogamescdn.com/assets/shared/icons/reward_icons/reward_icon_upgrade_kit_faery_rings.png}} | ||
|style="text-align:center;"| {{sized-external-image| | |style="text-align:center;"| {{sized-external-image|250px|https://foept.innogamescdn.com/assets/city/buildings/R_SS_MultiAge_PatrickBonusSet20d.png}} | ||
|- style="vertical-align: center;" | |- style="vertical-align: center;" | ||
|style="text-align:center;"| {{sized-external-image| | |style="text-align:center;"| {{sized-external-image|250px|https://foept.innogamescdn.com/assets/city/buildings/R_SS_MultiAge_PatrickBonusSet20a.png}} | ||
|style="text-align:center;"| {{sized-external-image|80px|https://foept.innogamescdn.com/assets/shared/icons/reward_icons/reward_icon_upgrade_kit_moon_gate.png}} | |style="text-align:center;"| {{sized-external-image|80px|https://foept.innogamescdn.com/assets/shared/icons/reward_icons/reward_icon_upgrade_kit_moon_gate.png}} | ||
|style="text-align:center;"| {{sized-external-image| | |style="text-align:center;"| {{sized-external-image|250px|https://foept.innogamescdn.com/assets/city/buildings/R_SS_MultiAge_PatrickBonusSet20b.png}} | ||
|} | |} | ||
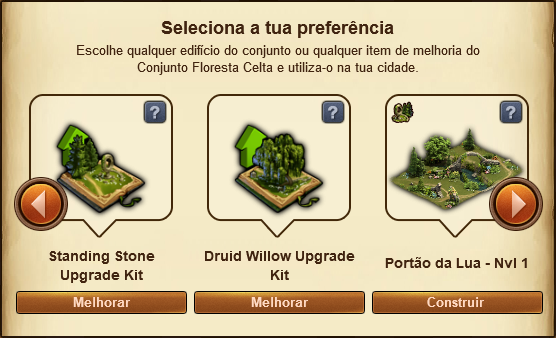
====Kit de Seleção da Floresta Celta==== | ====Kit de Seleção da Floresta Celta==== | ||
Se utilizares o Kit de Seleção, será aberta uma janela, onde podes escolher a tua preferência, um edifício do conjunto no nível 1 ou a sua melhoria: | |||
[[File:selection_kit_celtic_forest_set.png|center|link=]] | [[File:selection_kit_celtic_forest_set.png|center|link=]] | ||
A opção "Construir" coloca diretamente o edifício na cidade. A opção "Melhorar" permite melhorar o edifício existente na cidade. | |||
{| style="width: 100%; margin: auto;" border=2% | {| style="width: 100%; margin: auto;" border=2% | ||
| [[File:CelticForestSelectionWindow.png|center|link=]] | | [[File:CelticForestSelectionWindow.png|center|link=]] | ||
|} | |} | ||
Edição atual desde as 11h48min de 30 de abril de 2022
O Conjunto Floresta Celta ![]() é um conjunto composto por 5 edifícios diferentes, que podem ser melhorados para um segundo nível:
é um conjunto composto por 5 edifícios diferentes, que podem ser melhorados para um segundo nível:
 |
| Gamo Majestoso - Nvl 1 | Gamo Majestoso - Nvl 2 | ||||
|---|---|---|---|---|---|
 |
1 |
 |
1 |
||
| 2 |
1 |
2 |
2 | ||
| 3 |
2% |
3 |
4% | ||
| Pedra em Pé - Nvl 1 | Pedra em Pé - Nvl 2 | ||||
 |
1 |
3% |
 |
1 |
6% |
| 2 |
3% |
2 |
6% | ||
| Salgueiro do Druida - Nvl 1 | Salgueiro do Druida - Nvl 2 | ||||
 |
1 |
3% |
 |
1 |
6% |
| 2 |
3% |
2 |
6% | ||
| Anéis de Fada - Nvl 1 | Anéis de Fada - Nvl 2 | ||||
 |
1 |
 |
1 |
||
| 2 |
2 |
2 |
4 | ||
| 3 |
5 |
3 |
10 | ||
| Portão da Lua - Nvl 1 | Portão da Lua - Nvl 2 | ||||
 |
1 |
1 |
 |
1 |
2 |
| 2 |
2 |
||||
| 3 |
5 |
3 |
10 | ||
| 4 |
2 |
4 |
6 | ||
Melhorar o Conjunto Floresta Celta
Para melhorar cada um dos edifícios do Conjunto Floresta Celta é necessário um item de melhoria específico para cada um deles. Com o Kit de Seleção é possível escolher entre obter esse edifício no nível 1 ou a sua melhoria.
|
| |
|
| |
|
| |
|
| |
|
|
Kit de Seleção da Floresta Celta
Se utilizares o Kit de Seleção, será aberta uma janela, onde podes escolher a tua preferência, um edifício do conjunto no nível 1 ou a sua melhoria:
A opção "Construir" coloca diretamente o edifício na cidade. A opção "Melhorar" permite melhorar o edifício existente na cidade.
 |