Câmara Municipal: diferenças entre revisões
Saltar para a navegação
Sem resumo de edição |
Sem resumo de edição |
||
| Linha 34: | Linha 34: | ||
| style="text-align: center;" | Por Azulejo | | style="text-align: center;" | Por Azulejo | ||
|-style="text-align: center;" | |-style="text-align: center;" | ||
| style="text-align: center;" | [[file:2 Bronze Age.png|300px]] | | style="text-align: center;" | [[file:2 Bronze Age.png|300px|link=]] | ||
| [[File:icon_coins.png|link=]] 0<br />[[File:icon_supplies.png|link=]] 0<br />[[File:icon_diamonds.png|link=]] 0 | | [[File:icon_coins.png|link=]] 0<br />[[File:icon_supplies.png|link=]] 0<br />[[File:icon_diamonds.png|link=]] 0 | ||
| [[File:icon_size.png|link=]] 7x6 | | [[File:icon_size.png|link=]] 7x6 | ||
| Linha 46: | Linha 46: | ||
| style="text-align: center;" | Por Azulejo | | style="text-align: center;" | Por Azulejo | ||
|-style="text-align: center;" | |-style="text-align: center;" | ||
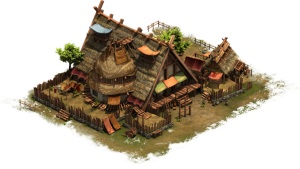
| style="text-align: center;" | [[file:3 Iron Age.png|300px]] | | style="text-align: center;" | [[file:3 Iron Age.png|300px|link=]] | ||
| [[File:icon_coins.png|link=]] 0<br />[[File:icon_supplies.png|link=]] 0<br />[[File:icon_diamonds.png|link=]] 0 | | [[File:icon_coins.png|link=]] 0<br />[[File:icon_supplies.png|link=]] 0<br />[[File:icon_diamonds.png|link=]] 0 | ||
| [[File:icon_size.png|link=]] 7x6 | | [[File:icon_size.png|link=]] 7x6 | ||
| Linha 58: | Linha 58: | ||
| style="text-align: center;" | Por Azulejo | | style="text-align: center;" | Por Azulejo | ||
|-style="text-align: center;" | |-style="text-align: center;" | ||
| style="text-align: center;" | [[file:4 Early Middle Ages.png|300px]] | | style="text-align: center;" | [[file:4 Early Middle Ages.png|300px|link=]] | ||
| [[File:icon_coins.png|link=]] 0<br />[[File:icon_supplies.png|link=]] 0<br />[[File:icon_diamonds.png|link=]] 0 | | [[File:icon_coins.png|link=]] 0<br />[[File:icon_supplies.png|link=]] 0<br />[[File:icon_diamonds.png|link=]] 0 | ||
| [[File:icon_size.png|link=]] 7x6 | | [[File:icon_size.png|link=]] 7x6 | ||
| Linha 70: | Linha 70: | ||
| style="text-align: center;" | Por Azulejo | | style="text-align: center;" | Por Azulejo | ||
|-style="text-align: center;" | |-style="text-align: center;" | ||
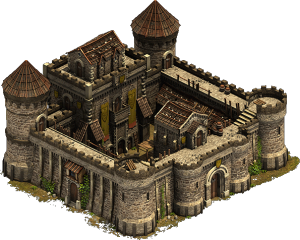
| style="text-align: center;" | [[file:5 High Middle Ages.png|300px]] | | style="text-align: center;" | [[file:5 High Middle Ages.png|300px|link=]] | ||
| [[File:icon_coins.png|link=]] 0<br />[[File:icon_supplies.png|link=]] 0<br />[[File:icon_diamonds.png|link=]] 0 | | [[File:icon_coins.png|link=]] 0<br />[[File:icon_supplies.png|link=]] 0<br />[[File:icon_diamonds.png|link=]] 0 | ||
| [[File:icon_size.png|link=]] 7x6 | | [[File:icon_size.png|link=]] 7x6 | ||
| Linha 82: | Linha 82: | ||
| style="text-align: center;" | Por Azulejo | | style="text-align: center;" | Por Azulejo | ||
|-style="text-align: center;" | |-style="text-align: center;" | ||
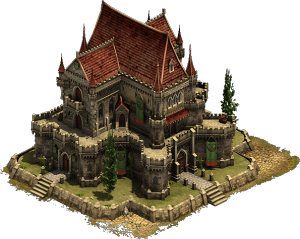
| style="text-align: center;" | [[file:6 Late Middle Ages.png|300px]] | | style="text-align: center;" | [[file:6 Late Middle Ages.png|300px|link=]] | ||
| [[File:icon_coins.png|link=]] 0<br />[[File:icon_supplies.png|link=]] 0<br />[[File:icon_diamonds.png|link=]] 0 | | [[File:icon_coins.png|link=]] 0<br />[[File:icon_supplies.png|link=]] 0<br />[[File:icon_diamonds.png|link=]] 0 | ||
| [[File:icon_size.png|link=]] 7x6 | | [[File:icon_size.png|link=]] 7x6 | ||
| Linha 94: | Linha 94: | ||
| style="text-align: center;" | Por Azulejo | | style="text-align: center;" | Por Azulejo | ||
|-style="text-align: center;" | |-style="text-align: center;" | ||
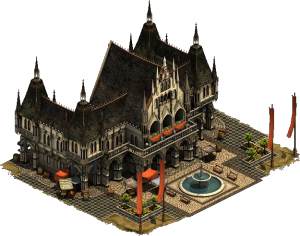
| style="text-align: center;" | [[file:7 Colonial Age.png|300px]] | | style="text-align: center;" | [[file:7 Colonial Age.png|300px|link=]] | ||
| [[File:icon_coins.png|link=]] 0<br />[[File:icon_supplies.png|link=]] 0<br />[[File:icon_diamonds.png|link=]] 0 | | [[File:icon_coins.png|link=]] 0<br />[[File:icon_supplies.png|link=]] 0<br />[[File:icon_diamonds.png|link=]] 0 | ||
| [[File:icon_size.png|link=]] 7x6 | | [[File:icon_size.png|link=]] 7x6 | ||
| Linha 106: | Linha 106: | ||
| style="text-align: center;" | Por Azulejo | | style="text-align: center;" | Por Azulejo | ||
|-style="text-align: center;" | |-style="text-align: center;" | ||
| style="text-align: center;" | [[file:8 Industrial Age.png|300px]] | | style="text-align: center;" | [[file:8 Industrial Age.png|300px|link=]] | ||
| [[File:icon_coins.png|link=]] 0<br />[[File:icon_supplies.png|link=]] 0<br />[[File:icon_diamonds.png|link=]] 0 | | [[File:icon_coins.png|link=]] 0<br />[[File:icon_supplies.png|link=]] 0<br />[[File:icon_diamonds.png|link=]] 0 | ||
| [[File:icon_size.png|link=]] 7x6 | | [[File:icon_size.png|link=]] 7x6 | ||
| Linha 118: | Linha 118: | ||
| style="text-align: center;" | Por Azulejo | | style="text-align: center;" | Por Azulejo | ||
|-style="text-align: center;" | |-style="text-align: center;" | ||
| style="text-align: center;" | [[file:9 Progressive Era.png|300px]] | | style="text-align: center;" | [[file:9 Progressive Era.png|300px|link=]] | ||
| [[File:icon_coins.png|link=]] 0<br />[[File:icon_supplies.png|link=]] 0<br />[[File:icon_diamonds.png|link=]] 0 | | [[File:icon_coins.png|link=]] 0<br />[[File:icon_supplies.png|link=]] 0<br />[[File:icon_diamonds.png|link=]] 0 | ||
| [[File:icon_size.png|link=]] 7x6 | | [[File:icon_size.png|link=]] 7x6 | ||
| Linha 130: | Linha 130: | ||
| style="text-align: center;" | Por Azulejo | | style="text-align: center;" | Por Azulejo | ||
|-style="text-align: center;" | |-style="text-align: center;" | ||
| style="text-align: center;" | [[file:10 Modern Era.png|300px]] | | style="text-align: center;" | [[file:10 Modern Era.png|300px|link=]] | ||
| [[File:icon_coins.png|link=]] 0<br />[[File:icon_supplies.png|link=]] 0<br />[[File:icon_diamonds.png|link=]] 0 | | [[File:icon_coins.png|link=]] 0<br />[[File:icon_supplies.png|link=]] 0<br />[[File:icon_diamonds.png|link=]] 0 | ||
| [[File:icon_size.png|link=]] 7x6 | | [[File:icon_size.png|link=]] 7x6 | ||
| Linha 142: | Linha 142: | ||
| style="text-align: center;" | Por Azulejo | | style="text-align: center;" | Por Azulejo | ||
|-style="text-align: center;" | |-style="text-align: center;" | ||
| style="text-align: center;" | [[file:11Postmodern Era.png|300px]] | | style="text-align: center;" | [[file:11Postmodern Era.png|300px|link=]] | ||
| [[File:icon_coins.png|link=]] 0<br />[[File:icon_supplies.png|link=]] 0<br />[[File:icon_diamonds.png|link=]] 0 | | [[File:icon_coins.png|link=]] 0<br />[[File:icon_supplies.png|link=]] 0<br />[[File:icon_diamonds.png|link=]] 0 | ||
| [[File:icon_size.png|link=]] 7x6 | | [[File:icon_size.png|link=]] 7x6 | ||
| Linha 154: | Linha 154: | ||
| style="text-align: center;" | Por Azulejo | | style="text-align: center;" | Por Azulejo | ||
|-style="text-align: center;" | |-style="text-align: center;" | ||
| style="text-align: center;" | [[file:12 Contemporary Era.png|300px]] | | style="text-align: center;" | [[file:12 Contemporary Era.png|300px|link=]] | ||
| [[File:icon_coins.png|link=]] 0<br />[[File:icon_supplies.png|link=]] 0<br />[[File:icon_diamonds.png|link=]] 0 | | [[File:icon_coins.png|link=]] 0<br />[[File:icon_supplies.png|link=]] 0<br />[[File:icon_diamonds.png|link=]] 0 | ||
| [[File:icon_size.png|link=]] 7x6 | | [[File:icon_size.png|link=]] 7x6 | ||
| Linha 166: | Linha 166: | ||
| style="text-align: center;" | Por Azulejo | | style="text-align: center;" | Por Azulejo | ||
|-style="text-align: center;" | |-style="text-align: center;" | ||
| style="text-align: center;" | [[file:13 Tomorrow.png|300px]] | | style="text-align: center;" | [[file:13 Tomorrow.png|300px|link=]] | ||
| [[File:icon_coins.png|link=]] 0<br />[[File:icon_supplies.png|link=]] 0<br />[[File:icon_diamonds.png|link=]] 0 | | [[File:icon_coins.png|link=]] 0<br />[[File:icon_supplies.png|link=]] 0<br />[[File:icon_diamonds.png|link=]] 0 | ||
| [[File:icon_size.png|link=]] 7x6 | | [[File:icon_size.png|link=]] 7x6 | ||
| Linha 178: | Linha 178: | ||
| style="text-align: center;" | Por Azulejo | | style="text-align: center;" | Por Azulejo | ||
|-style="text-align: center;" | |-style="text-align: center;" | ||
| style="text-align: center;" | [[file:14 The Future.png|300px]] | | style="text-align: center;" | [[file:14 The Future.png|300px|link=]] | ||
| [[File:icon_coins.png|link=]] 0<br />[[File:icon_supplies.png|link=]] 0<br />[[File:icon_diamonds.png|link=]] 0 | | [[File:icon_coins.png|link=]] 0<br />[[File:icon_supplies.png|link=]] 0<br />[[File:icon_diamonds.png|link=]] 0 | ||
| [[File:icon_size.png|link=]] 7x6 | | [[File:icon_size.png|link=]] 7x6 | ||
| Linha 190: | Linha 190: | ||
| style="text-align: center;" | Por Azulejo | | style="text-align: center;" | Por Azulejo | ||
|-style="text-align: center;" | |-style="text-align: center;" | ||
| style="text-align: center;" | [[file:15 Arctic Future.png|300px]] | | style="text-align: center;" | [[file:15 Arctic Future.png|300px|link=]] | ||
| [[File:icon_coins.png|link=]] 0<br />[[File:icon_supplies.png|link=]] 0<br />[[File:icon_diamonds.png|link=]] 0 | | [[File:icon_coins.png|link=]] 0<br />[[File:icon_supplies.png|link=]] 0<br />[[File:icon_diamonds.png|link=]] 0 | ||
| [[File:icon_size.png|link=]] 7x6 | | [[File:icon_size.png|link=]] 7x6 | ||
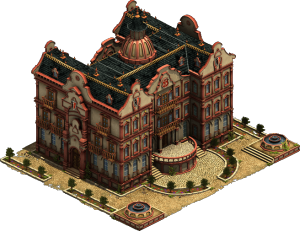
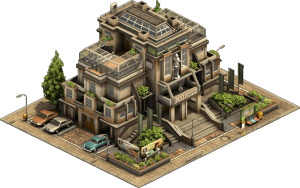
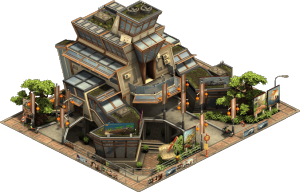
Revisão das 16h56min de 20 de setembro de 2016
Câmara Municipal
Tipo: Edifício Importante
Dimensões: 7x6
Obtido em: Início do jogo
- Apenas é possível ter uma destas estruturas, não pode ser vendida, todas as estradas para os restantes edifícios estão aqui conetadas
- Entrar na Câmara Municipal dá acesso às mercadorias existentes, notícias e perfil de jogador
- Atualiza automaticamente uma vez atingida uma nova era na árvore tecnológica
- Não pode ser motivada, polida ou saqueada
- Não é influenciada pela felicidade da cidade e Grandes Edifícios
- Produz Pontos Forge se a guilda a que pertences estiver no nível adqueado
| Idade da Pedra | Custos | Requisitos | Fornece | Por Azulejo |

|
||||
| Idade do Bronze | Custos | Requisitos | Fornece | Por Azulejo |
|
||||
| Idade do Ferro | Custos | Requisitos | Fornece | Por Azulejo |

|
||||
| Início da Idade Média | Custos | Requisitos | Fornece | Por Azulejo |
|
||||
| Alta Idade Média | Custos | Requisitos | Fornece | Por Azulejo |
|
||||
| Finais da Idade Média | Custos | Requisitos | Fornece | Por Azulejo |
|
||||
| Era Colonial | Custos | Requisitos | Fornece | Por Azulejo |
|
||||
| Era Industrial | Custos | Requisitos | Fornece | Por Azulejo |
|
||||
| Era Progressiva | Custos | Requisitos | Fornece | Por Azulejo |
|
||||
| Era Moderna | Custos | Requisitos | Fornece | Por Azulejo |
|
||||
| Era Pós-moderna | Custos | Requisitos | Fornece | Por Azulejo |
|
||||
| Era Contemporânea | Custos | Requisitos | Fornece | Por Azulejo |
|
||||
| Amanhã | Custos | Requisitos | Fornece | Por Azulejo |

|
||||
| Futuro | Custos | Requisitos | Fornece | Por Azulejo |

|
||||
| Futuro Ártico | Custos | Requisitos | Fornece | Por Azulejo |

|